Showing posts with label mapping. Show all posts

Monday, 31 March 2025

The Great Rebranding

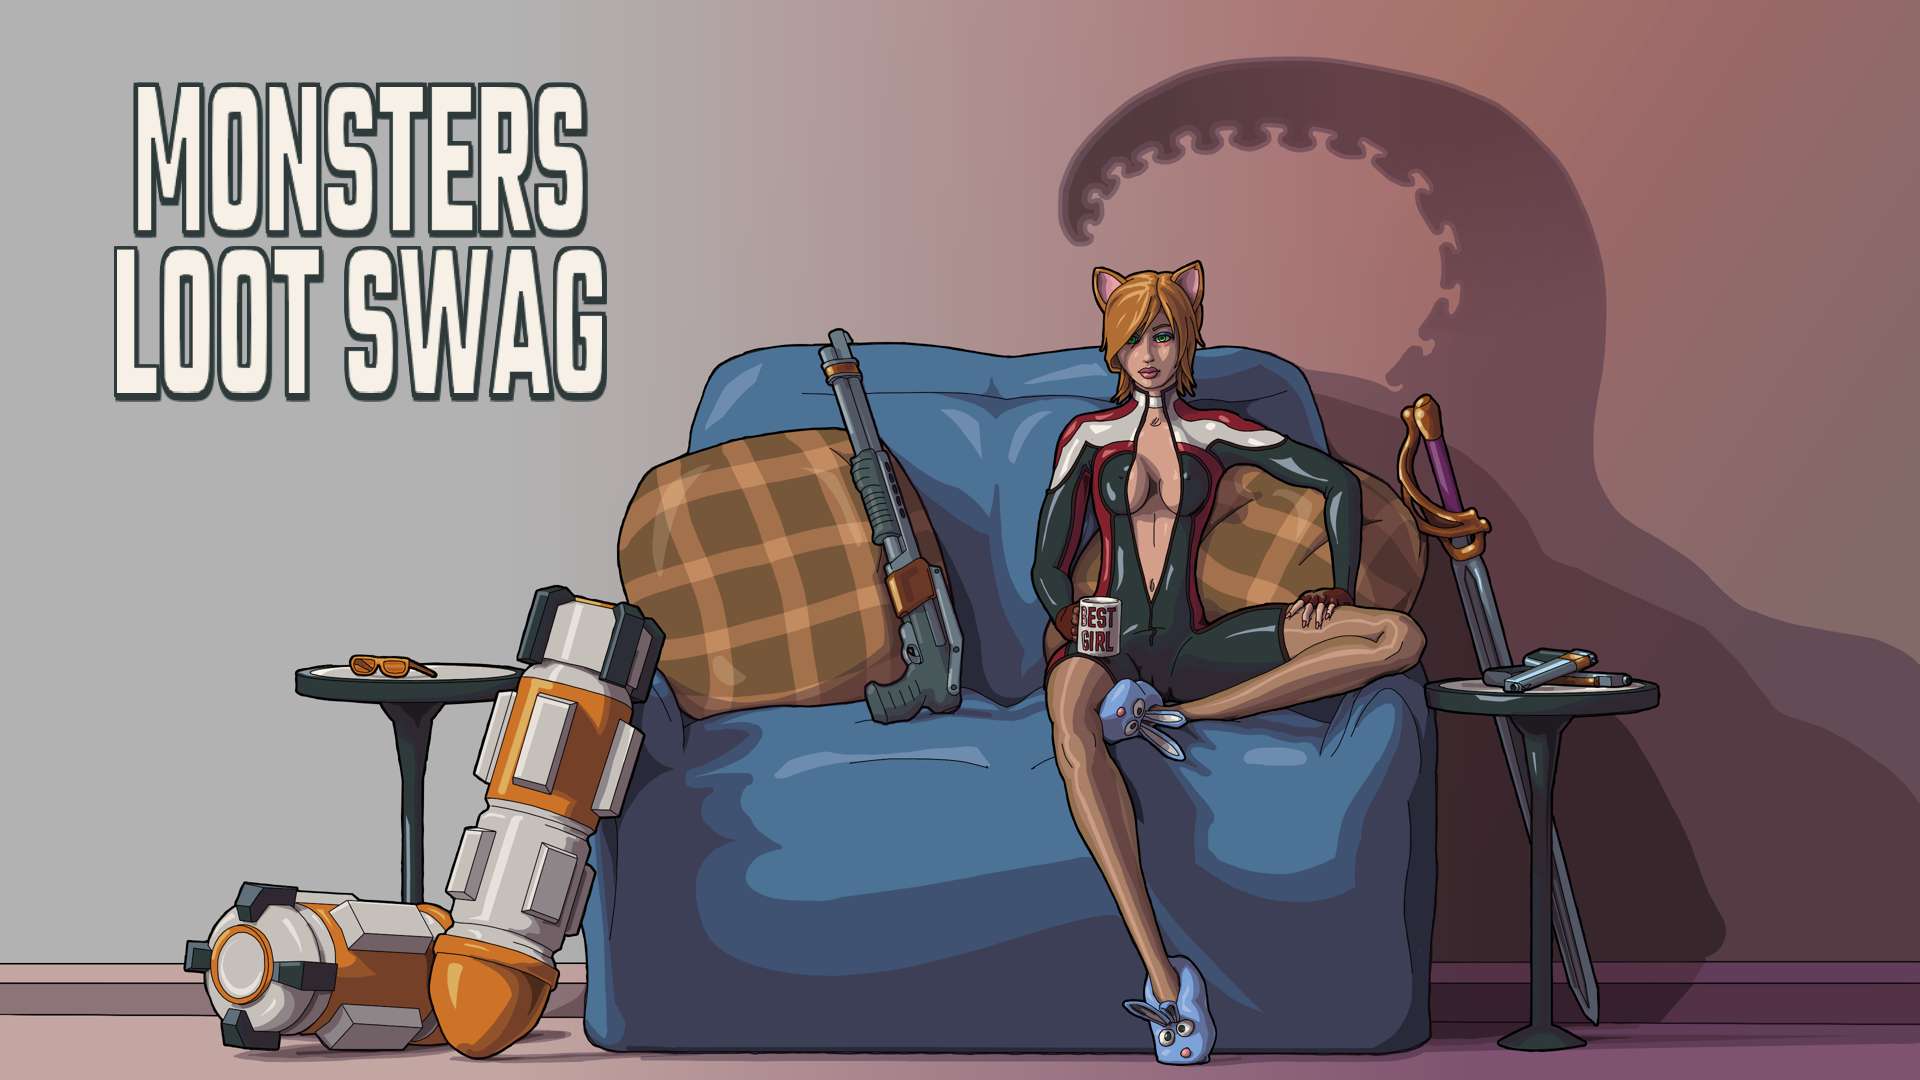
Monsters Loot Swag - rebranded

 The Great Rebranding of Monsters Loot Swag is upon us.

I decided with full release from Early Access due soon™ that the main brand artwork would benefit from being in the same style as all the other character portrait art, and so set about coming up with a new paintings. This is also the style which the intro and outro sequences will take - and that itself is currently the immediate ongoing work, and really the last thing to do before full release.

Early Access has alas not worked out as I had originally hoped for, being immediately lost into a sea of being ignored, but then I expect that this is just how it goes for the average no-name indie devs launching early access games.

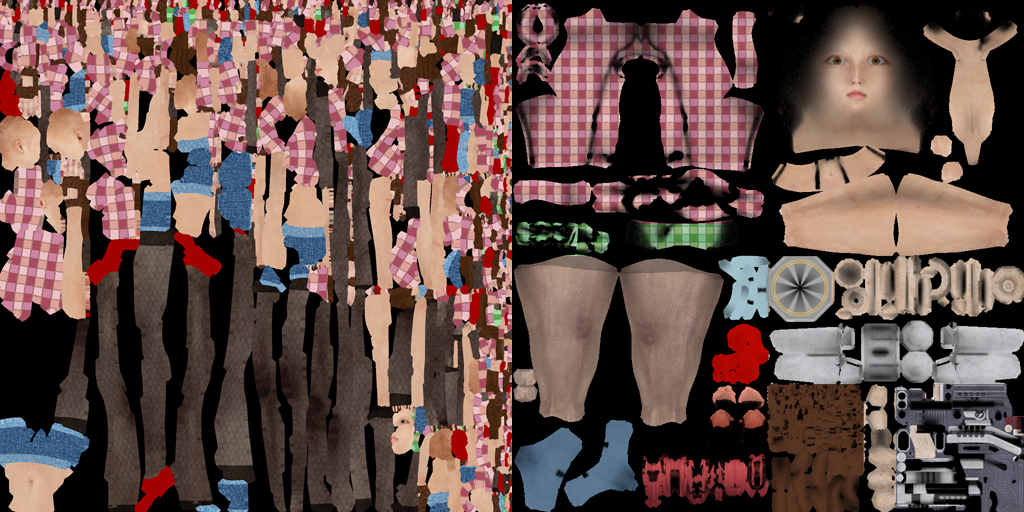
One thing modeling related which I have been doing amongst the veritable onslaught of drawing, has been to retopographize some of my earlier catgirl models. Previously I had used a Blender3D plugin to automate highpoly models down to lower tris counts. Whilst that had saved quite a lot of time, the tris count was still rather high considering the game is a top-down shooter with the characters being fairly small on screen, and the resulting UV maps were horrible strips, not the sort of thing that could ever be considered modder friendly.

Left: Automated; Right: Manual Retopology

 I had used the custom generic player character which I had manually retopologized from April 2024, and this itself reduced polycount by around 60% of what the automated plugin did, all whilst preserving human readable UV maps. I find that due to the small size of the player model on screen, that baking ambient occlusion into the albedo/colour map improves how it looks, even though ambient occlusion still takes place inside the PBR ORM map (occlusion, roughness, metal).

The generic retopologized human character model

So, once again it was a case of do not send a machine to do a man's job ... and all of the presumed labour-saving of yesteryear had been for naught. So now, I am the proud owner of 8 lowerpoly catgirls who all weigh in around 4-6K triangles.

In frog related news I have been forced to put netting over the frog pond as my local murder of corvids have been committing murder in the frogpond. 🐸 

I have been feeding the crows for a while and they've always been very friendly so this sudden turn of events was completely uncalled for. They're big fans of that awful US style burger cheese (wouldn't touch the stuff myself) and also rather fond of monkey nuts, when they're not getting gristly bits of steak or other cutoffs. Also I've seen them beat up Herring Gulls which is what I really want them hanging around for.

So that was the month of March space year 2025, and my efforts to finish off the fluff piece of explaining an actual plot for Monsters Loot Swag continues, taking up much drawing and GUI planning, with all still on course to ship in April.


Sunday, 31 March 2024

Terrors Of Retopography

4K tris versus 8K tris

 Amongst a slew of bug fixes I have been designing a new unlockable playable character. This has once again led to problems of topology - or more accurately retopology from a not very high poly character to a much lower poly character.

You would think that there would be some automated plugin that could do all of this for you, that it could take a mesh with a lot of triangles and reduce it whilst keeping some semblance of the vertex point weightings. And there is, and it can ... except you have to kiss goodbye to your nicely laid out UV map. Now you try modding this ...

Behold the computer generated horrors beyond your comprehension

It does a really good job of decimation and a really terrible job of UVs, textures and materials in general.

The problem appears to be that my starting mesh is some +20K tris, which is great for an up-close viewing of the character - especially in the viewports of Blender - but not so great when you want it reduced auto-magickally. Especially as I hate manual retopology due to it being the utter epitome of donkey work.

If only you could just remove edge loops in a sensible way - but wait! You can! Blender has it's own decimate modifier, and surely loops can be reduced just as the can be increased? Yes but no.

Just auto-reduce loops bro! Yeah but nah, but really wtf is this?

However this is something that could be cleaned up, and in the end I did, thus using that as a new basic mesh to work from, and it's a much more reasonable 6K tris. And after customizing that to a new character, it can be manually reduced by merging loops to keep the bone weights and UV maps intact.

Try and spot the difference from the actual game camera height

 Once again the real problem seems to be the tunnel vision of working up close in the modeling editor, and I am sure that that 4K mesh could get some more reductions without anyone ever noticing. However it appears to be not just me that goes overkill on character meshes ...

Squint percentage per eye ...

Dragon's Dogma 2 character creator allows for squints by percent per eye ... but in-game, your character is barely a third of the screen in height. Not sure that is going to be all that visible when your character's head is only 64 pixels.

My new playable catgirl cosplayer is called Polaris, and does that εŒ—ζ–—η™Ύθ£‚ζ‹³, Hokuto Hyakuretsu Ken thing minus the waaa-ATATATATATA battle cry, so you'll have to shout it yourself. The character portrait isn't completed yet and I'm still balancing the stats and attack attributes, so update to Steam should be next week.

It's British Summer Time, at least horology wise, I am removing the winter duvet, so naturally the weather has taken a turn for the worst. Maybe with April here Spring might finally start, as it seems to have done nothing but rain and be generally miserable since October.


I also had a thought about the methodology of making a roaming brawler, one where the player could upgrade to the move sets and customize their own controls based on fighting styles and how to code this as combat events. This brought me back to thinking about the melee combat system I coded an example of previously which uses hitboxes, and whether that would be good gameplay system; a (probably side) scrolling roaming hack and slash where you level up your character not just with attributes but also armour and weaponery, restarting each "run at the game" with all the new stuff you earned in previous runs. This way the player would start off very weak and get killed quickly, then spend whatever XP you acquired on better stats or kit and go again, eventually leading to the player becoming massively OP in early levels. It would work a bit like reverse permadeath, with the player's XP being permanant and allowing the unlocking and equipping of better weapons and protections but also melee based move sets that could be customized to control binds.

As Monsters Loot Swag near completion, 1 more level with enemy boss, and 2 more playable characters to add, I am beginning to think more of what the next game will be, and after having created the proof of concept for MLS NINE FUGGING YEARS AGO I think I need to work on a shorter development cycle for my next project.

Monday, 31 July 2023

Flaming July Raining July


Behold, 693 materials converted to PBR - but the models LOD out quick so you can't see that here - trustMeBro
July has ended as Flaming June started ... flaming wet. The chances of a good strawberry crop in August diminish by the second.

Work wise, every single object in Monsters Loot Swag has been updated to the latest engine version and the fancy-pants visuals of Physical Based Rendering (PBR). All 693 materials have been changed to get rid of the diffuse and specular mapping, and brand spanking PBR compiltable albedo and Occlusion / Roughness / Metallic (ORM) maps have been created. I also settled on a standard 512 pixel size for the vast majority of objects as they are not large enough during gameplay to warrant textures any bigger (except bigger boss monsters and the such which are now 1024 pixel maps). All of this should also help reduce the total memory footprint for texture loading.

This new version of Monsters Loot Swag will be initially available as a beta on Steam, before later becoming the standard game version.

Boris The Spoder-Tank reflecting a rather barren test level in real-time

All of the terrains for the already completed 7 levels (3 more to do) have also been updated to the latest engine build, and are now filled with reflection probes to simulate the area around specific features.

A reflection probe before I realized I had to embiggen the capture radius to get objects to reflect in it

Slowly and methodically porting the game to the new engine has caused a few issues, namely my previous disregard for naming conventions. Many files ended up being called "thing_x_new4_v08_redux_final_final2" and then added to a profile, but the new engine uses an asset system so suddenly naming is important, and the file's name becomes the profile name. This was further confounded by previously having multiple files of the same name in different folders, so a fair bit of renaming has occurred, especially in the 262 audio files which needed to be called the name of their profiles.

So, next up is getting the actual old gameplay logic to work with the new asset system. I am optimistic that this will not be too difficult and that the main issues will revolve around some renaming of server and client connection commands. As ever I prefer to work methodically so that I can actual see where things have changed and understand how the new processes work - which seems infinitely preferable to ham-fistedly ramming the whole game into the "convert to new build button" and then wondering why everything is a mangled arse afterwards.

Hopefully August will also see a return to some decent sunny weather and I can get back to shorts and a t-shirt rather than continue building an Ark in a jumper ... we live, as ever, in hope ...


Friday, 12 February 2016

World Building Test And The Secret Of Grass

Onwards to world building. I had decided to dispense with the stock terrain and foliage systems, and instead thought of constructing each level out of custom meshes.
With the game's perspective being topdown/high-isometric, I had decided that polycount would not be much of an issue for the whole thing to run smoothly, as not too much of the game world would ever be visible at any one time. I intend to tonemap all of the world geometry with third-party app pureLight, though I've also used Blender to do this previously, and then set the in-game lighting to incorporate lightmaps, so that the diffuse/albedo map is influenced by the tonemap but the normal/specular maps are altered by the dynamic lighting.

Before I could getting cracking on world building, there was the small issue of coming up with a functioning work process, as well as load testing, and the awkward issue of how to get grass to animate without using the forestObject's moving foliage shaders. Players love stuff on screen, and if there's one thing they love more than stuff on screen it's moving stuff on screen.


How do I into grass?

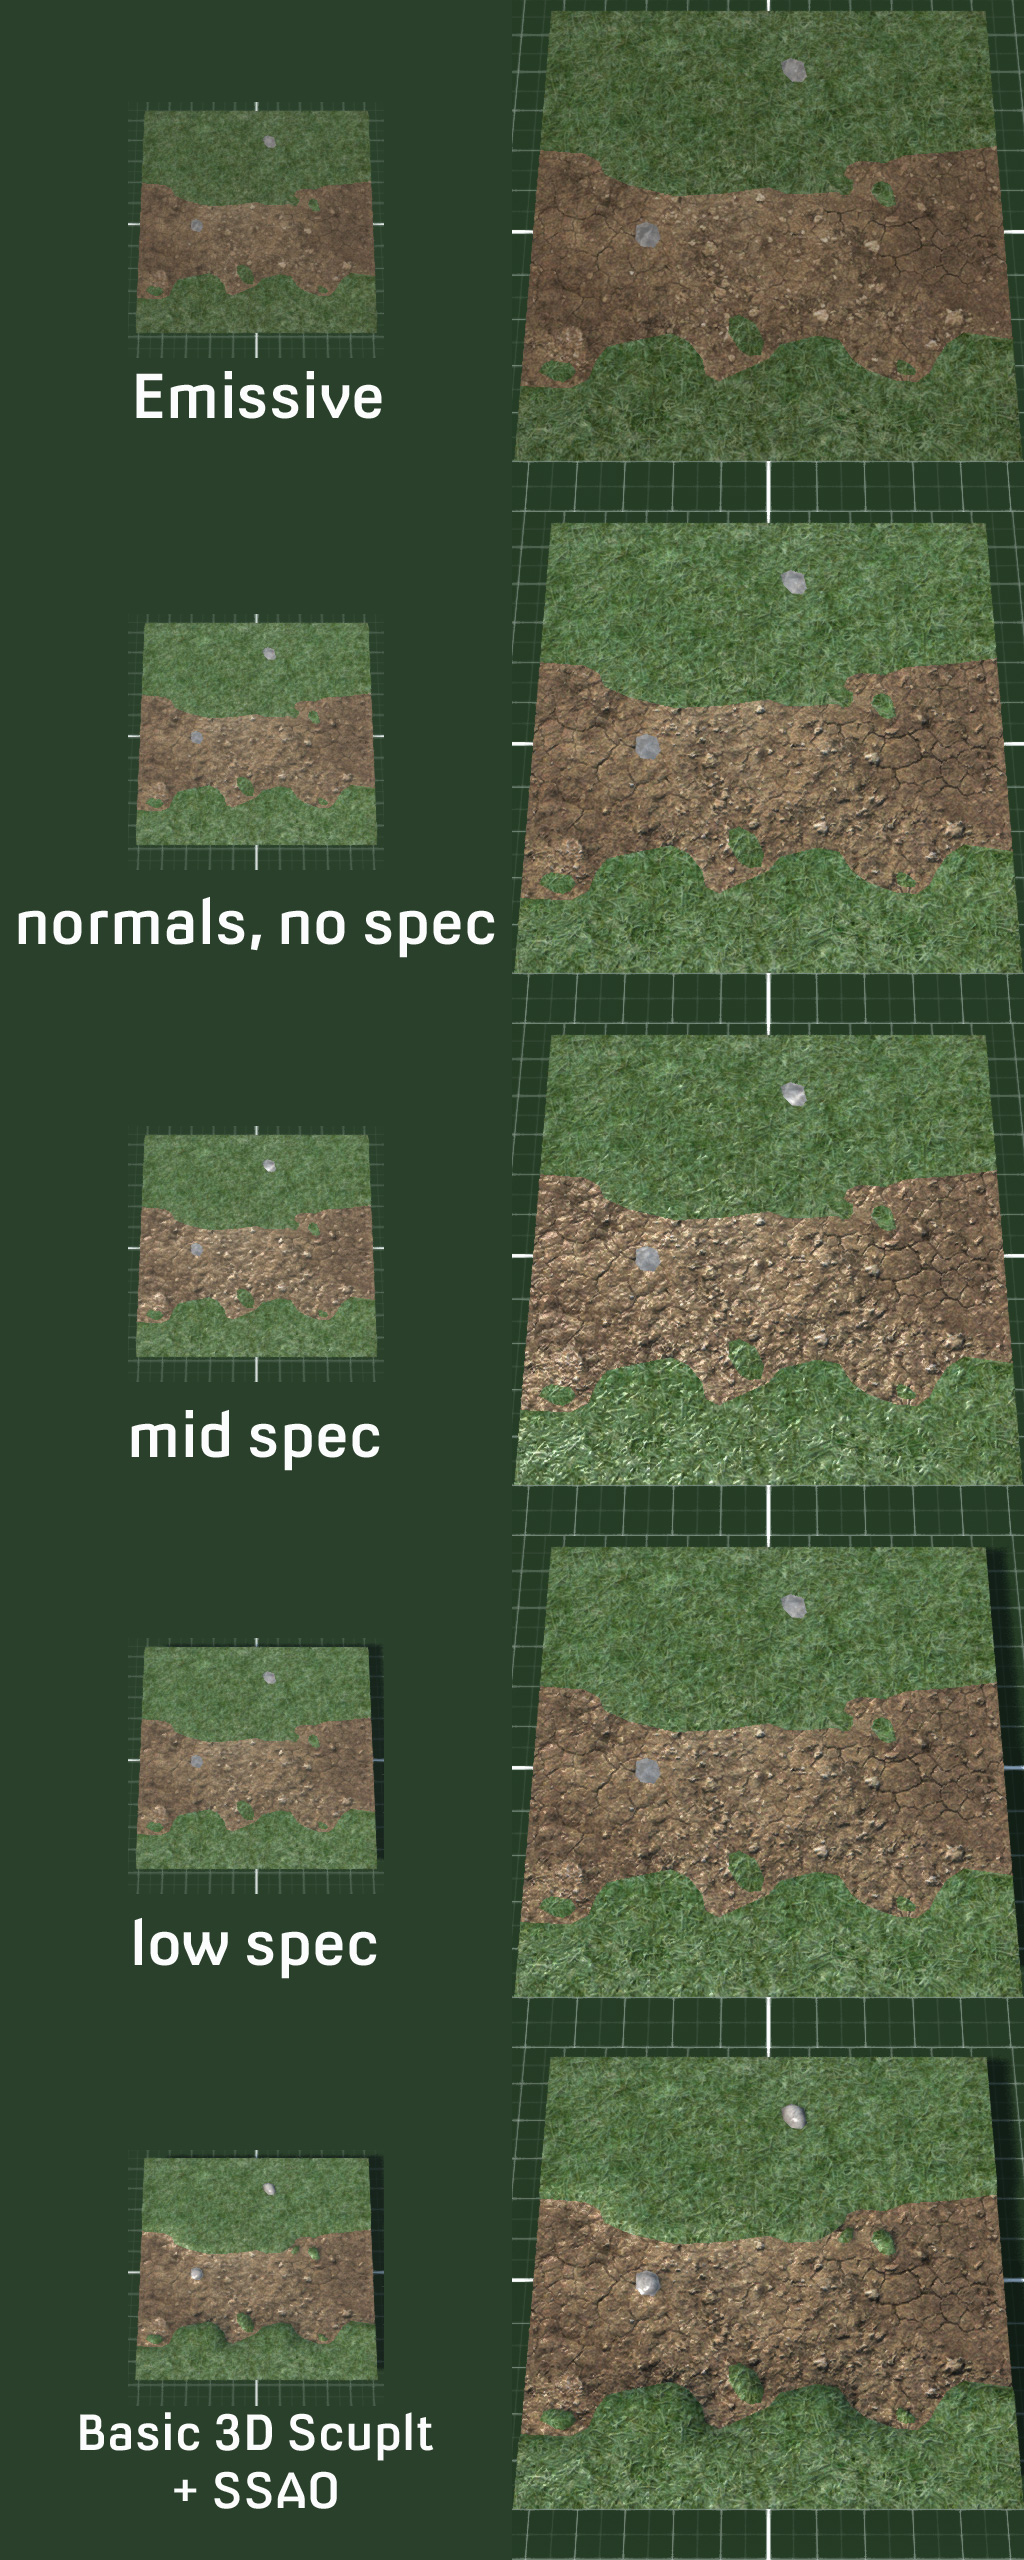
First up, basic construction testing. I decided on a 10x10 mesh with multiple textures of grass, dirt, and rock - 1 drawcall per material. I was not particularly bothered about polycount for testing so there's a lot more geometry than needed. I wanted to create a few islands of grass and rock to make it look more interesting. Specular was initially somewhat overkill and really needed toning down to almost off, but just enough to create some very slight highlights. I modeled the mesh for some physical depth, raising grass and rock layers.


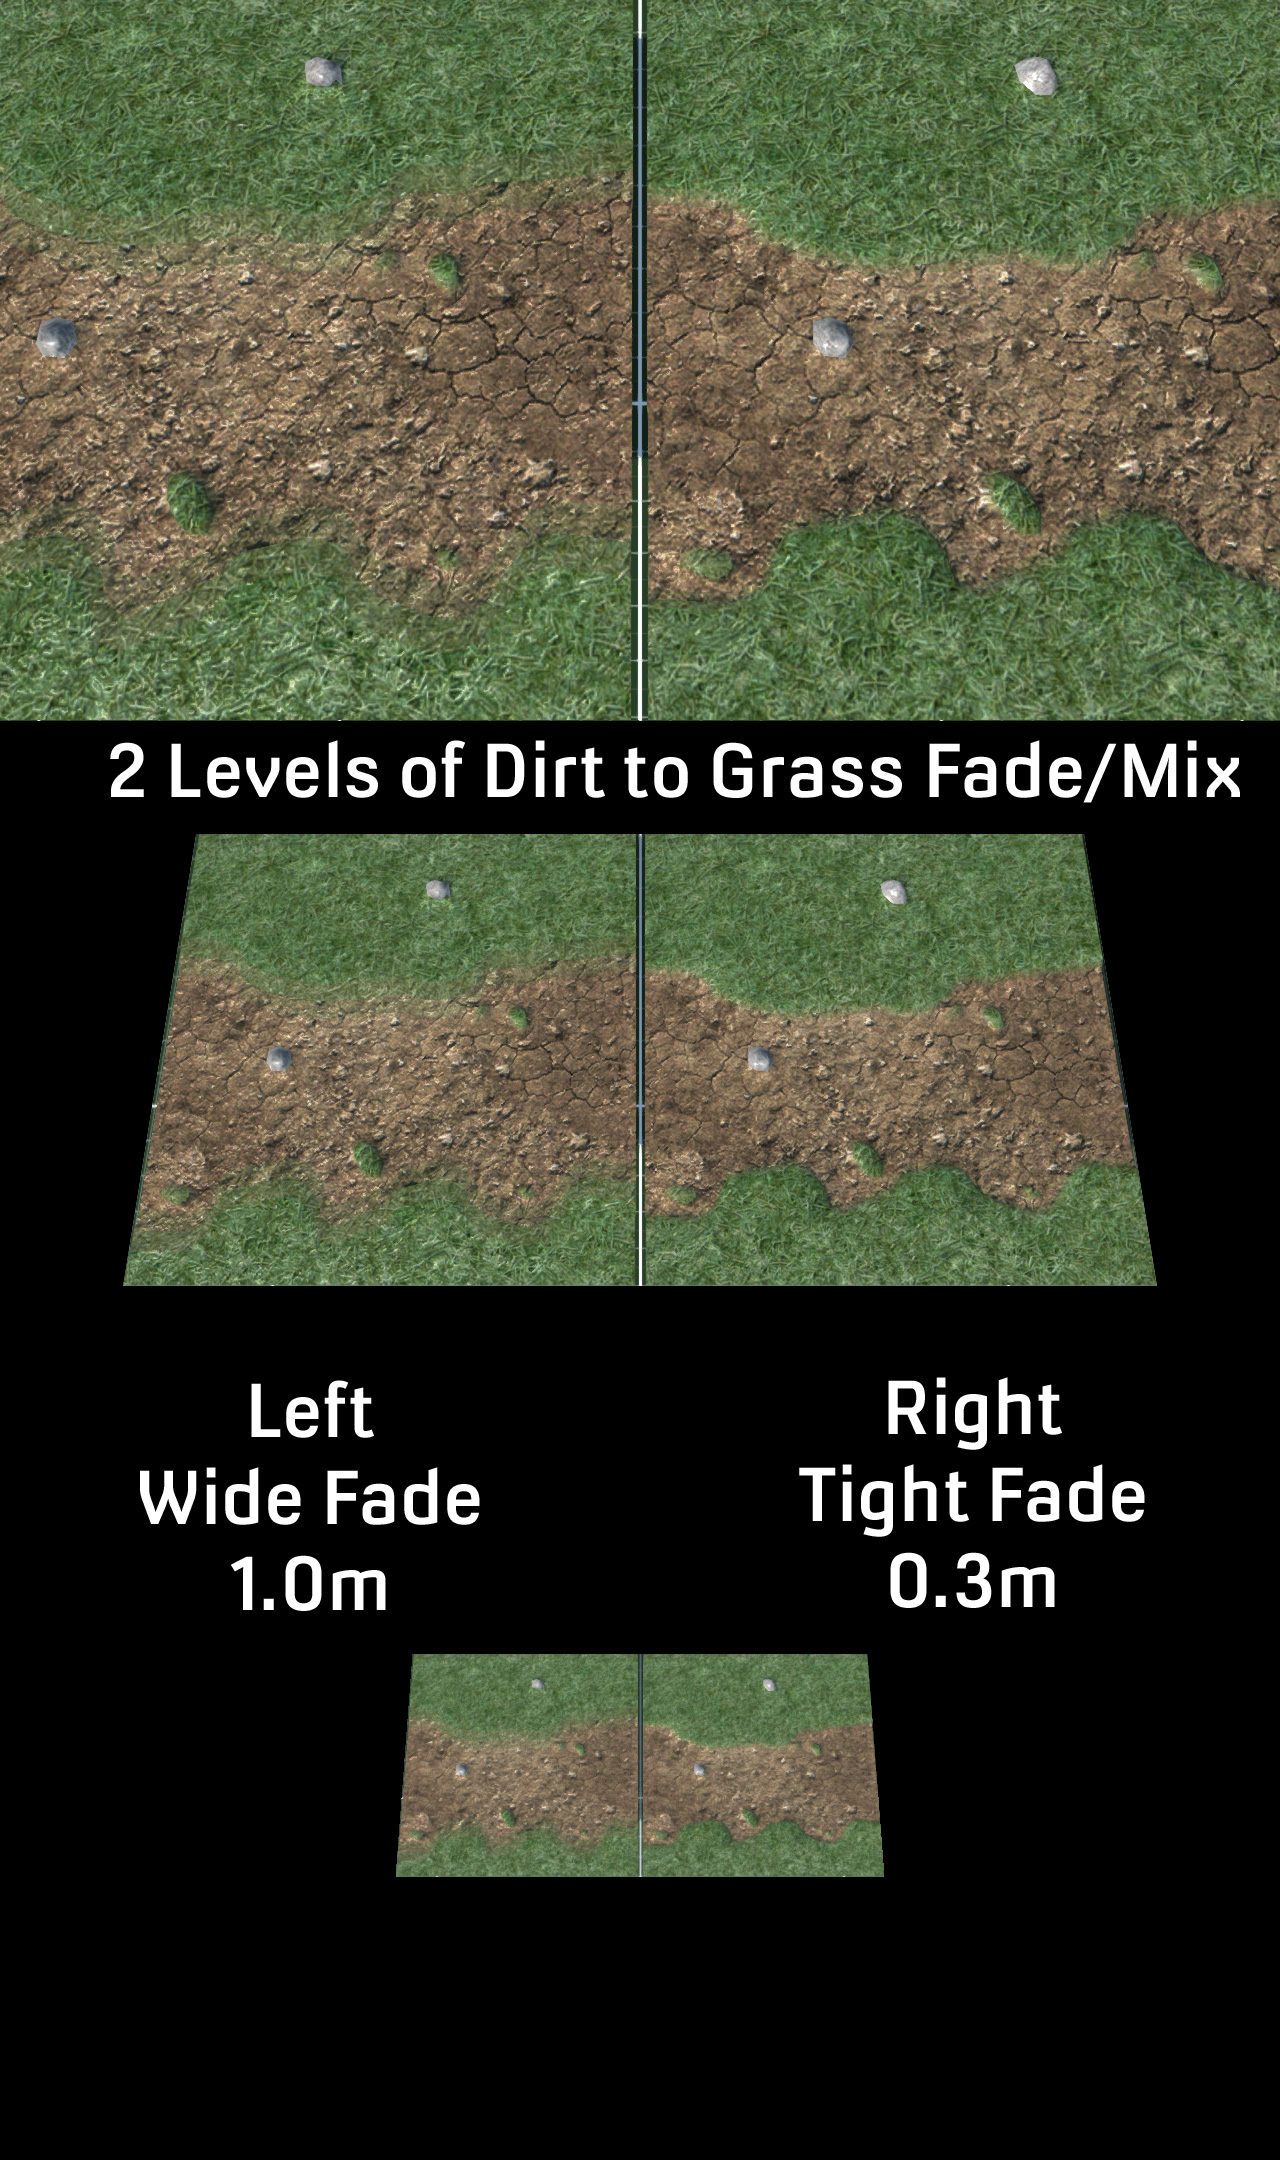
Not bad for a start but the edges of the grass and dirt were a little hard. Of course in real life, grass and dirt don't just fade into one another, but in video games things look odd without blending. I tried various levels of blends but found that just 2 worked fine for what I wanted. Spreading the blend over a metre seemed enough distance  to break up the harshness of the change from dirt to grass.


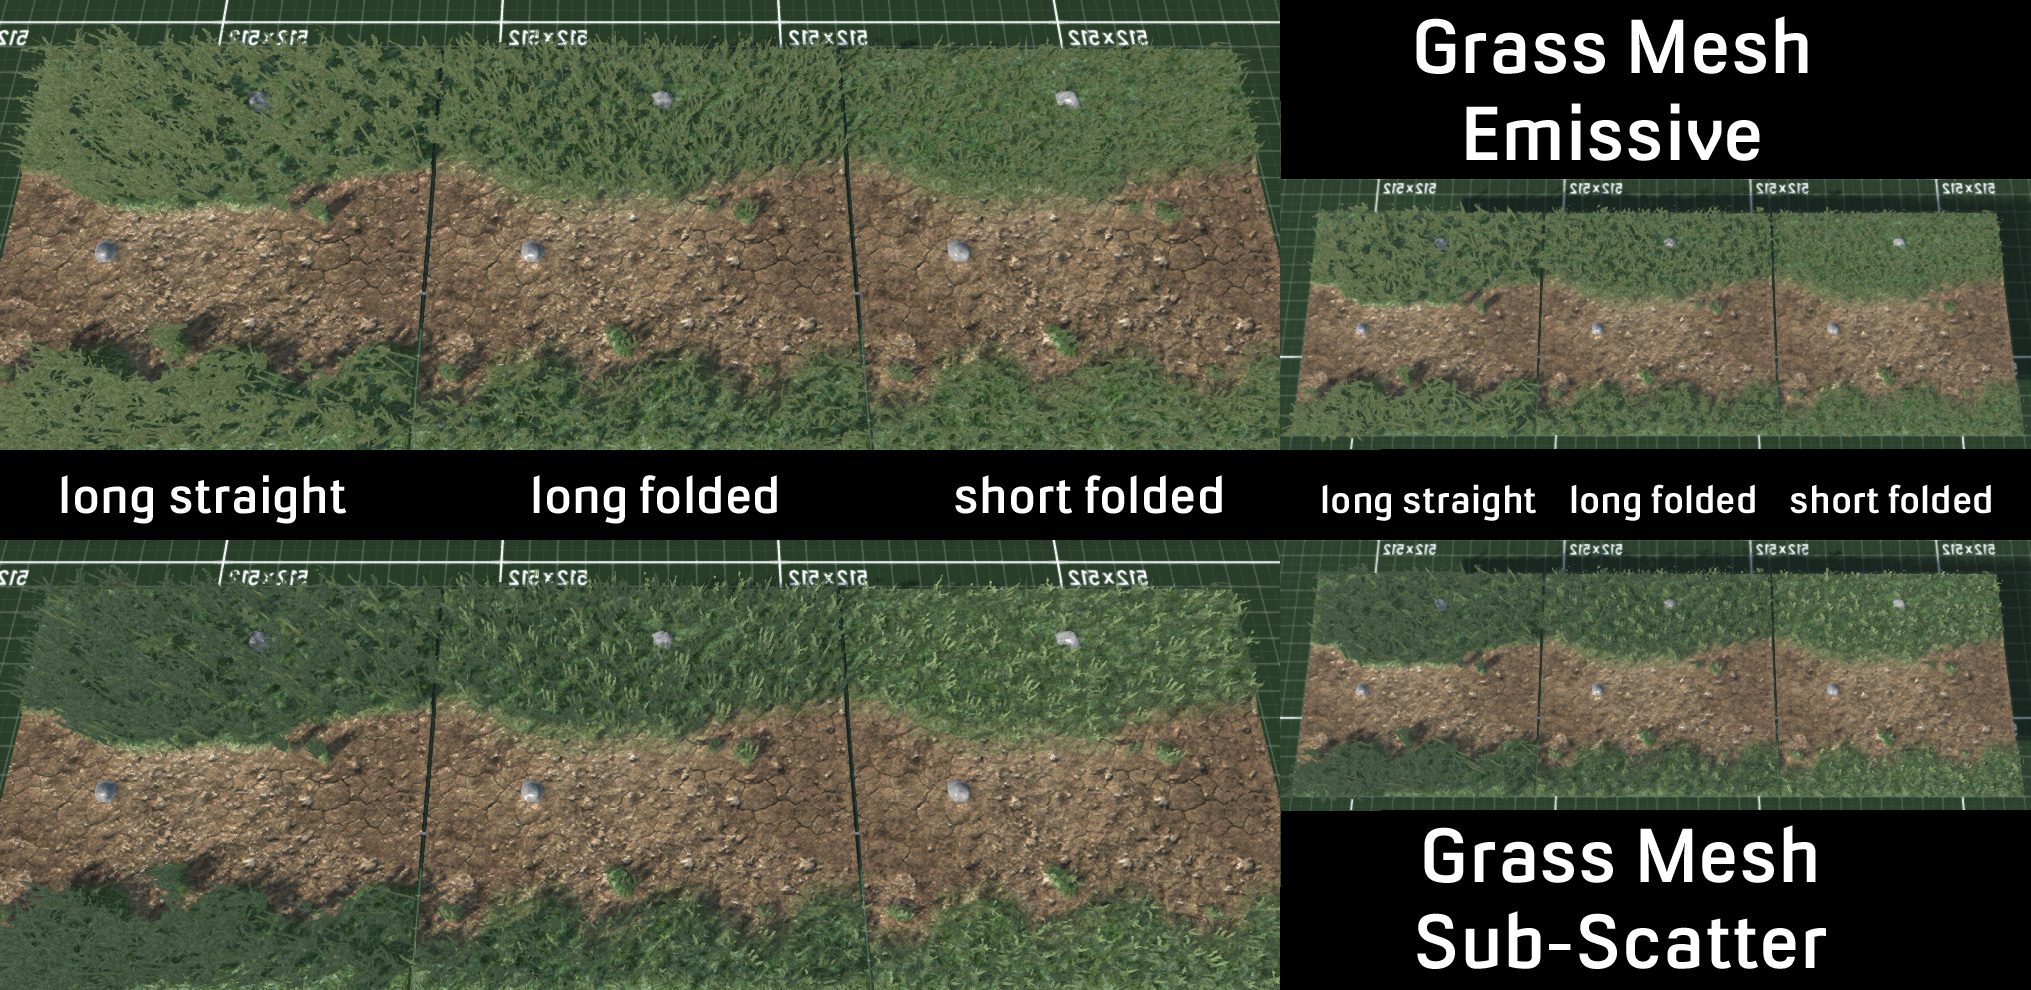
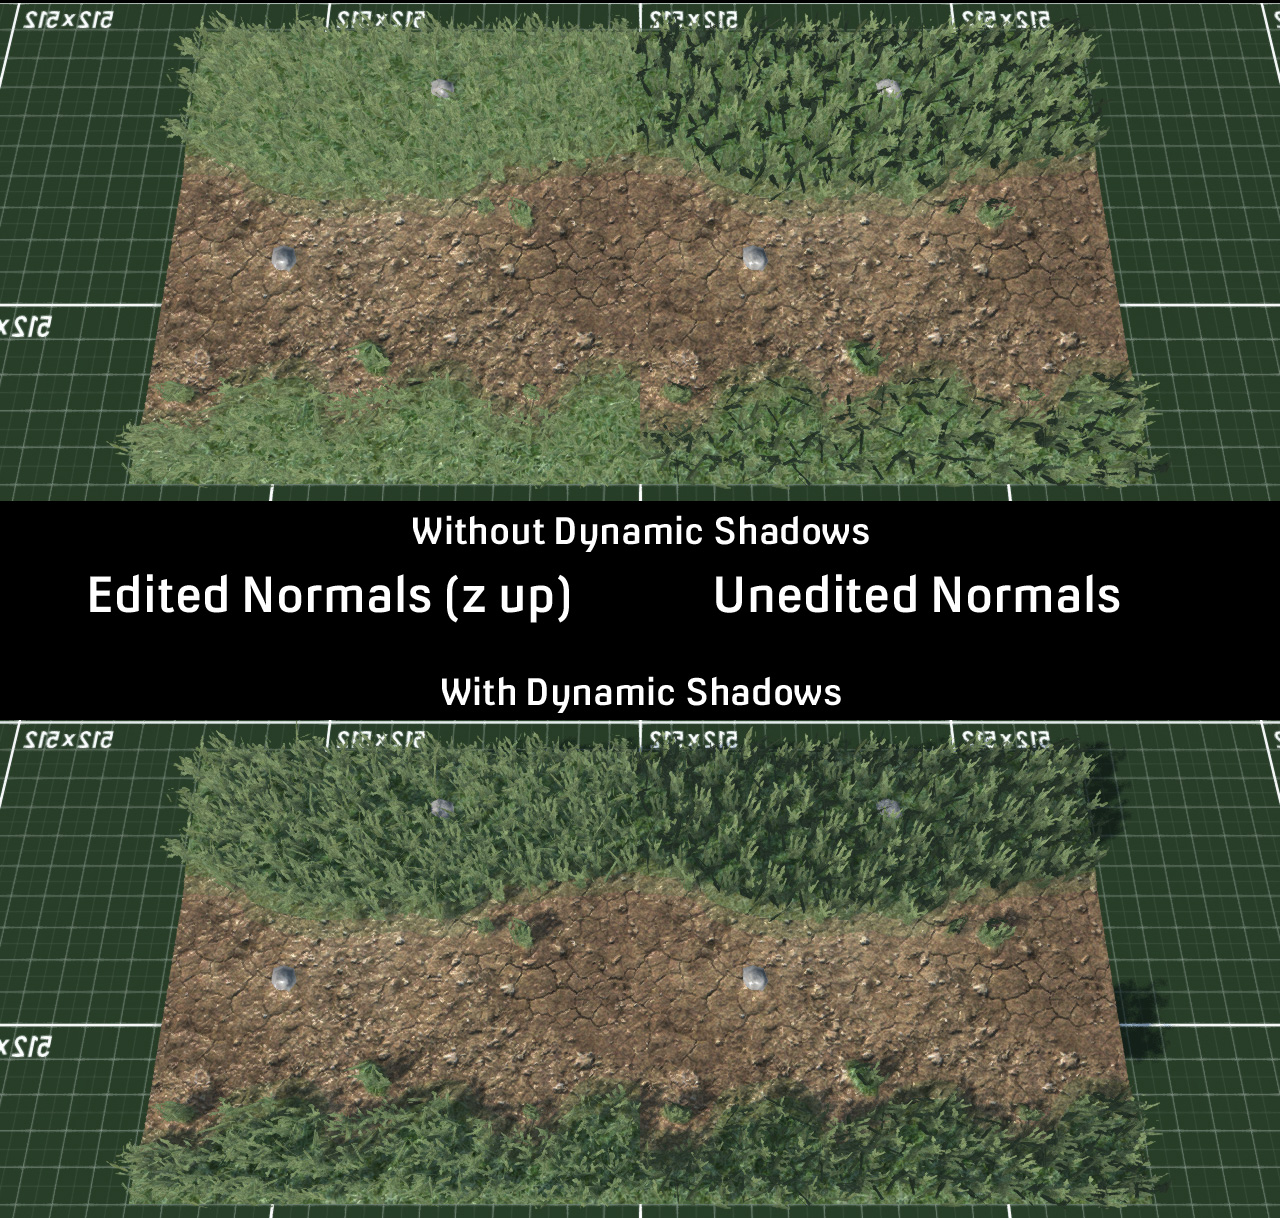
Satisfied with how modeling was going I moved on to grass and immediately hit problems. I found a grass image to use as a placeholder and covered the grass terrain texture in a couple of thousand planes for testing. With the game's high viewpoint, having straight polys looked bad, so I set about dividing the meshes and bending them over at an angle so everything leaned and tilted. Polys facing directly away from the main lightsource had some strange and frankly annoying blackness to their planes. Using an emissive material solved this - but then everything looked like a uniformed colour and became just an amorphous mass. Adding subscattering to the shadows helped to ease the harsh blackness of the polys but it still didn't appear as though they were being properly illuminated.


So off I went on an intrepid quest to find out what the hell was going wrong via insert-your-favourite-internet-search-engine-here. Normals were the problem. Foliage normals apparently need to point up to receive proper lighting. But alas the ancient 2.44 version of Blender from 2007 which I still use - because ... convenience - cannot into normal editing - however the new 2.76 version can. Luckily most of the hotkeys seem to be the same so it wasn't too difficult to pick up, and normal editing itself is just a modifier.

Goodbye horrible black stuff ruining the aesthetics of my foliage

I had decided that making an animated texture for moving grass would give the look I desired with very low overhead. I had created a huge level with over 9000 meshes for load testing, and just to see how bad it would be,  I used bone animation to move the grass polys and the framerate immdiately died to around 20 fps. So, just as expected then, back to animated textures.

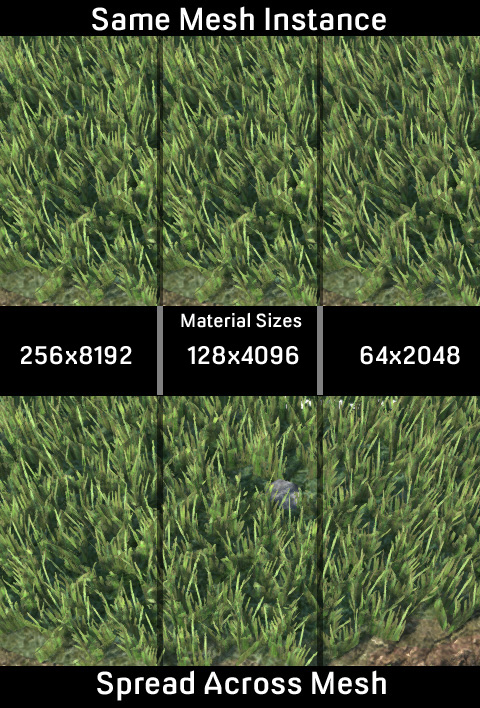
I created a high poly grass mesh in Blender based on this little gem found on the internet (http://forums.torque3d.org/viewtopic.php?f=18&t=18#p53), and then animated it using multiple bones, and rendered out the frames. I tried various frame numbers and speeds, and it shouldn't be too much of a surprise that the more frames an animation has, the better it looks, so I settled on 32 frames. I found that the grass didn't really need much movement in the animation, and in fact looked better with less, rather than wildly thrashing about with higher movement. The renders also scaled nicely. Originally taken at 256 pixels, it gave a rather terrifying size of 8192 pixels, way more than older GPUs would want to cope with. It could be reduced via "nearest neighbour" to prevent blurring to 64x2048 and still look good.


One thing which I had noticed was an annoying uniformity of movement in the animation which gave an unpleasant  "swelling" effect. Setting different planes to different parts of the UV map meant that they played different parts of the animation and helped break up the regularity. I also decided to create multiple animations based on differing meshes and combine them all into a single atlas/mega texture. I ended up with 1 thick grass render with lots of grass stalks, a thinner medium one, and 2 thin small ones. I then combined the 2 small ones to be anew  medium one, and finally added the other medium to create a new thick mesh. All in all, this gave meanimations for 6 different sized grass clumps to help combat the sameness of just one animated texture. Combined together on a single 2048 pixel image, there was plenty of space for further cosmetic variations such as colour, lightness/darkness, saturation changes and the sort.
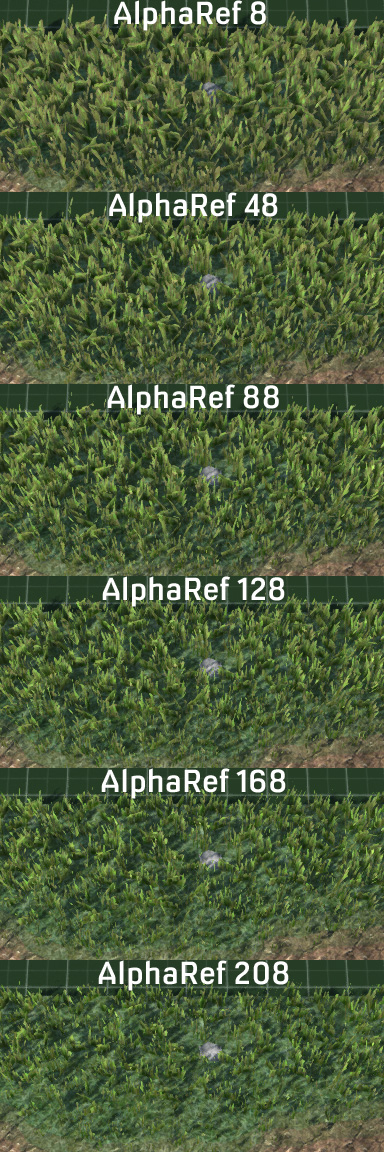
I had a little play around with alpha reference to see the difference have thick to thin grass made.


Quite happy with conquering the secrets of grass I moved on to load bearing. I had previously created a 1 kilometre level, filling it 10,300 copies of the mesh. Viewed in it's totality it was 119 million polys, 124,000 drawcalls and a mspf of 666.667 - which gave me a sudden urge to play Iron Maiden's greatest hits. However, even close in the result was 40 million polys and 5 fps. A quick check of culling revealed ... well, not as much culling as I had hoped. With the camera set back and angled a lot more was rendering in the fustrum than was actually visible. Of course during these tests I had no "Level Of Detail" for my 10K meshes. I made multiple levels of LOD and set up the options preferences so that they reduced polys and materials the lower you set it, but also LODed hard outside of the immediate camera view. In the end I had things down to show the highest LOD on screen all at once with 70 fps, 665K polys with 913 drawcalls and half of that is shadowing which won't feature as much once I start using lightmaps and the diffuse material filters the main dynamic light source.

I also tested less instances of meshes, combining 9 of them into a single object. This reduced the total number of meshes from 10,300 to a mere 1,160. Polys went up slightly to 772K, drawcalls fell dramatically to just 235 - a third of which was shadows, and fps rose to a thrilling 100+ fps. All of which was somewhat to be expected.

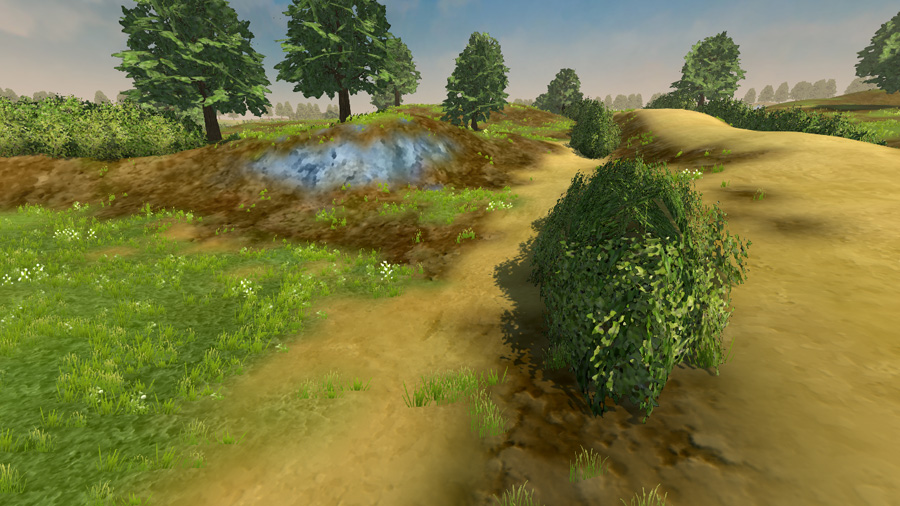
So here's what that all looks like with the additions of screen spaced ambient occlusion and a vignette shader around the edges. I think having the grass bent over a little more might help aesthetically, but I'm quite pleased with the result and the performance.


Wednesday, 7 May 2014

Realism Mod Total Conversion And From Tehran With Love

Quick update on the current work on the Airship Dragoon realism mod/total conversion.

 Above: Before new grass and sky textures.

Above: After new grass and sky textures.

It's a total conversion of the original levels/battlefields, replacing all textures and models with more realistic/high-poly versions. Some of the work is created from scratch by myself, some previously licensed from other sources such as Ron Kapaun, GarageGames and Forester Pro.

Here's a few videos ... though youTube has frankly mangled the quality and introduced some annoying blurriness. Everything looks better in HD but you knew that already ...


In other news I had an After Action Report featured on Grogheads, a nice hardcore war/strategy game site.

Also, it appears that the Ayatollah is quite taken with Airship Dragoon, and the Iranian Revolutionary Guard just can't get enough of it! Well ... I found a link to an Iranian pirate site which gave it a good review ...


Oh, and where torrents say "cracked" ... well there's no DRM, so what could all of those "crack.exe" files be containing? First guess that begins with the word "virus" wins a free internet.

Persian also seems to be a language which google translate knows fluently ... unlike some better known and more populous languages ...

Airship Dragoon is in the Top 100 games on Steam Greenlight. There's no legitimate reason you shouldn't vote for it ... except if you don't like traditional strategy games or you don't use Steam ... both of which are ... er ... perfectly legitimate reasons I guess ...


Thursday, 31 May 2012

I Break Everything And Then Fix It! Oh The Exciting Life Of Indie Deving!

I had a liver detox diet, lost the strange bicycle tire which had appeared around my torso, eat more fruit than anyone had ever eaten before, took up skipping - which is knackerising - bought a few crates of ale and a bottle of baffling expensive rum under the guide of death metal celloist (it was a very pretty bottle),
sat about in the garden because it had finally stopped raining in the Shire of York after the wettest Spring since 1907. And even found time to break everything that I'd done dev-wise whilst trying to fix it.

So I ended up changing my art style again ... immediately after I'd decided on what it was going to be ...

So it is now more "painterly" and less "abstract".


I'd done a bit of refractoring my working level, shrinking the size of the hedges a little and opening more gaps between them. I'd also noticed that I'd been getting a fair few failures on pathfinding with the Recast resource. My terrain is very bumpy and I'd set >1500 custom class CoverNodes about and done pathfinding between them with an automated script to test around 7 million paths. Initially I'd a rather worrying 2.5 million failures, and after a bit of saving throws in my pathfinding scripts, I'd got that down to <200k, and then thrown in a simple "move to nearest node where you can actually get a path" incase that 3.7% failure rate occured in game.

I'd improved my Ai, getting them to make decisions about when they should try and hide from the player. Previously they'd either stopped at distance if they were "support" or advanced if they were "assault". I've always been a fan of turn based strategy/tactics games ... which is why I'm making one obviously ... but sometimes their Ai has been a bit ... daft. Steel Panthers I'm looking at you. I added in a whole load of new thinking to make the computer act more in the way a player would, but still using it's randomized battle plan.

Suddenly my Ai were filled with awesome and powered by buttkicking, so it was time to remove all the little helpers I'd given them previously to make them more competitive, like maxing out their stats, they now get the same chances for decent stats as the player.

Which all goes to make battles more competitive, varied and fair.

Somewhere amongst all of this I'd noticed a few bugs so I'd fixed them, and thus managed to break "many things", again mostly pertaining to the Ai. After a fair bit more hitting IDE with a mallet I got things working again as they should do.


I'd also made a start on creating some player characters - or at least a "base character". I'd looked at some of the meshes that I'd got from Evolver for use in Blender some time ago, and studied one of these as a base for rigging and animating a custom character. I'm doing a SteamPunk vibe, so everyone "struts imperiously". I'm still using Ye Olde Blender 1.44 with DTS exporter 0.964, though I export with collada for the foliage/trees/bushes so I can use vertex painting.

I'd also made a whole load of improvements to my GUIs, such as adding a new button for reserving a shot at half maximum range if you don't want your little chap to be wasting shots on things miles away that he's unlikely to hit. In "loadout" I'd also added the ability to equip one chap and then have his equipment cloned to all unequipped troops - money and individual strength/encumberance permitting - which is incredibly useful when you have a bag of Conscript Militia who can only use basic equipment until they get promoted ... should any of them survive the battle.

Still to do is a bit more Ai thinking tweaking, a bit more environment tweaking, creating some finalized models for troops and weapons, testing the assault and defend gametypes, doing the art for GUIs, and errr ... general stuff. My bug fixing list gets smaller, my todo list doesn't seem to. Oh the exciting life of Indie Deving!

tl;dr good things happened, bad things got fixed, I'm eating a lot of fruit.

Sunday, 7 March 2010

Raging Texture Terror Usurped By Drawcall Delerium!

February flew ... fled ... or fffffff .... apparently ... or at least I didn't get a blog done anyhow. This may or may not be the same thing.

But we've been busy, 'cos ... well ... we're always busy ... and not just with talking about myself in 3rd person.

Having had a good read through some resources, I appropriated all the bits I liked into a custom weapon->clip->inventory system. Figured it'd take a good effort, say 16 hours, so settled in for a mammoth stint. And I did then iron out all the bugs after around 60 hours ... not quite what I'd planned on and hard to say how much of that time was actually spent rewriting the same thing from scratch after various mess ups as it's all a bit hazy but it did all get done in that week, and every possible way that the player could try to break the cycle and cause a bug has been covered. It's really all about logical arguements ... and me not considering all of them before starting. What happens if you have auto-reload and the player hits manual reload? Or tries to change weapons? Or aims down sights in mid reload? Or ... any of a number of things which cropped up as bugs and had to be squashed.


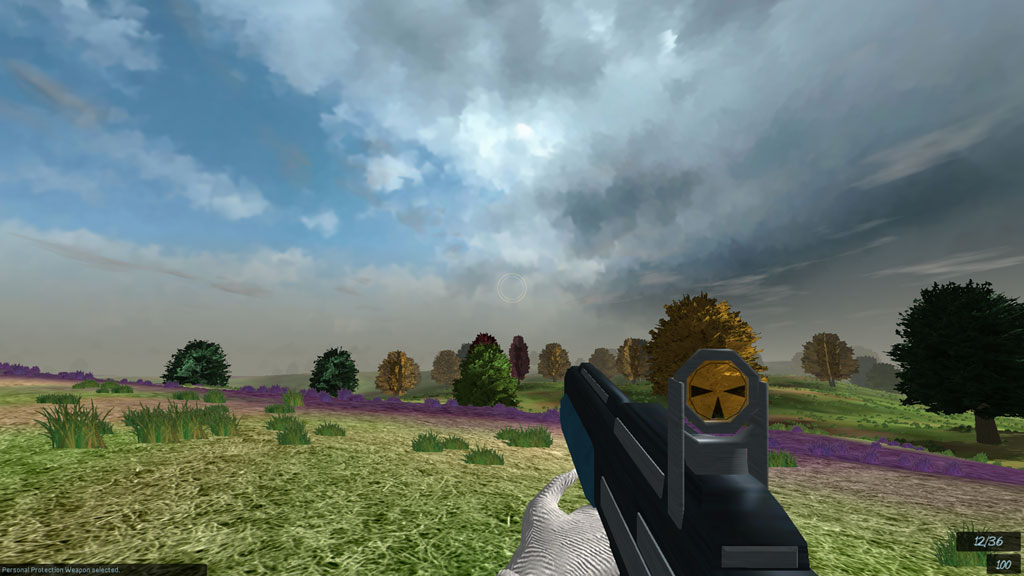
Still have to sort out my first person weapon, arm animations, and it will have to be a seperate arm attached to the weapon model in first person, as expanding on my previous synchronize aim-down-sight with 3rd person model hasn't proved successful.


Ripples - Automatic weapon fire - the perfect skipping stone?

And whilst messing with the whole weapon stuff, we've also had a good go at particle effects in general. Redoing all my weapon impact particles, ditching muzzle flashes in favour of mesh ones, and sorting out the impacts. I also "pooled" as many datablocks as possible for both particles and sounds, rather than having all individual ones listed in the individual weapons' cs files.

After browsing around I found that Indy Games company "Sickhead" had mentioned about the incompatibility of dogs and particle effect sources, and it hadn't occured to me to use actual effects like water or smoke for source material for particles before, as opposed to just trying to draw them, which I had done previously. And it all appeared much better.


Fire and Smoke particles made with real smoke

I also knocked up a little script to loadup specific datablocks for specific missions/levels in an attempt to keep preloading overhead down. I worked out a bit of info on audio and mainmenu music, as well as started to build the basis for my final play GUI. This involved a certain amount of umm/ah about how much GUI to actually have and especially the fate of the dreaded "crosshair". In the end I settle on a fair bit of GUI clutter on-screen, as I'm not after supposed realism. Most of it will be achieved as pop-ups - think inventory system akin to HL2, and I decided on an empty circular reticle as opposed to crosshair/no crosshair, which can be toggled and faded through 4 iterations or turned off completely. I've still a few more design decisions to make on the whole GUI thing ... but most of it is sketched into the cunning plan.


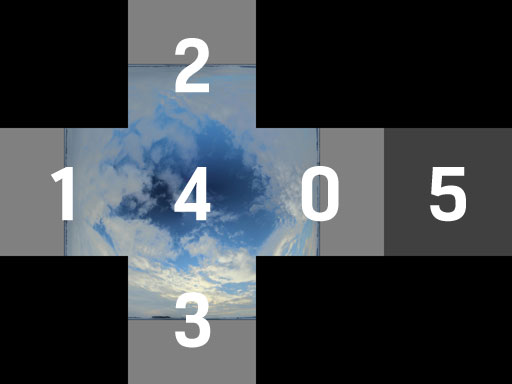
I also started to think about terrains and environments more, knocking up some terrain textures and fiddling with various settings. In the end I decided against parallax and continued to err on the side of numbers of stuff rather than eyecandy. I came up with a painterly style for skyboxes ... all very artistic and not half as difficult to make the sides join up seamlessly as I had initally feared. Also found out/had forgotten that relfection maps need to be rotated 180 degrees from the skybox, so you can't just use the same thing.


Did I mention textures?

As a remnant of TGE/A, when I found my texture memory being devoured by large textures, I've had a bit of paranoia about texture sizes, and had always tried to use as small an image size as I could (max 512) and split UV maps between multiple small textures. Of course this doesn't take into account drawcalls, and so I had a bit of a rearrange, merging a number of UVmaps into single textures. Most noticeably in my AI/Player models, which I had previously split into boots/trousers/jacket/armour/hands/headgear/face/extras - and that all produces a fair few extra drawcalls. Amalgamting all of that into a single UVmap (still only x1024) gives me a reduction of around 1500 drawcalls per 25 Ai characters, and a mild boost to fps on my current GTS250. So, texture memory paranoia has been vanquished! Or at least replaced with drawcall paranoia ...

And I did the same on a number of props which use several textures.


Groundcover is currently placeholder I knocked up quickly

Also did some general tweaking, made more models, messed around with my AI scripts a little, and started to contemplate how best to create an in-game save/load system. And some other stuff ... which I can't remember. Did I mention doubling up weapon selection on the 0-9 buttons a la HL2 so you can choose 20 weapons with 10 keys in a previous blog? If not, that's done too and bug squashed.

The engine I'm using (Torque3D) is another beta and it is shaping up nicely, and I've already been modding how the quality options of the new OptionsGUI works, to make some of the changes more noticeable in both terms of performance/eyecandy gain/loss.

Still on my list of not yet accomplished, are to redo the weapons (for the ump-frickin-teenth time) and have them work with animated 1st person arms which render/no render on 1st/3rd person camera, sort out clip/ammo reloading animations for all of this (12 weapons so far - 20 planned), make some more AI models (say 2 distinct types). After that it's tweaking AI scripts, and then soem actual gameplay making! Which has been so long I might have actually forgetton how to do it!

So ... not too much in February which was planned but didn't get done, and plenty that didn't get planned that did get done --- but that's the adhoc production nature of being one bloke, in his bedroom, trying to make computer games.


If I actually manage to get my proposed demo out by April ... it'll be exactly 2 years since my last demo.

Tuesday, 15 September 2009

No Deer For A Month

Homer: "You got it, no deer for a month"
Marge: "Did you say beer or deer?"

No blog for a month, August passed by unblogged. So this is megablog ... or not, as the case may be. But there is stuff and quite a bit of it.

Also no Swiss Toni this time ... or ... ever ... again.

I'd made a whole load of stuff, props and the such. And then gone back and resorted my original ultra-low poly car because all my newer stuff really made the very old models look bloody awful, so I need to bring a few of the older stuff up to scratch so it doesn't look out of kilter. Whilst I was at it, I stuck a little scripted flashing blues and twos in there, so the emergency lights loop a consecutive red to blue on. For dramatic exaggeration I slapped a "corona" on to the flashes, just a few intersecting planes of translucent texture. Though it makes a rather nice effect. The models now also have glass and an interior.


New motors ... still lowpoly, with a base texture for the body until I do something more

I'd set about populating my initial huge level with various new stuff, as well as blocking in the portals and zones, and then testing various versions/sizes/numbers of zoning. I'd also thrown a huge load of triggers out, controlling simgrouped lights for each area, turning them on/off as required with the player's progression/backtracking, and this saved a great amount of fps. Not having submeshes rendering when out of view would do the same, and I know there has been some talk amongst the devs on this, but in the meantime this proved a good performance boosting workaround.

The stuff is your standard low-poly sofa, bed, piping, consoles, wardrobes, toilets, showers, etc. As well as a host of monitors, some with helpful information like directions, and some with various scripted flashing messages using hidemesh rather than ifl. Also thought a bit more about player related gameplay, and decided to go old school, so no recharging health and you'll be able to carry 20 ridiculously large BFGs. However none recharging health means medkits, and I don't really fancy have tonnes of them lying around. There are plenty of games which have a finite amount of these things, meaning if you're not doing well, you can soon run out of supplies in the game world, making completion of a dangerous task impossible due to low health.


Aidstation with clear and amusing instructions - in Advanced and Basic Lighting

So I came up with the cunning plan to have AidStations dotted about my game world. A bit like HL2 does, but with infinite reuses - only it takes them 60 seconds to recharge. Fine if you're hurt and have to run back/forwards away from the danger to get healed, but rather more tense if you're being chased by a big beastie and are trying to avoid getting hit whilst the timer ticks down to recharge. I'd had a look at how the "heal" function in stock T3D worked, and it's really more of an incremental health increase, I fancied something a bit fast and made a simple setdamagelevel call during onCollision. Run into an AidStation when wounded and get up to 60 health back, the blue button turns amber and depresses, the AidStation is unuseable for 60 seconds. Plus it's got the instructions written on it, so the player will understand what is going on in-game even though they didn't read the readme.txt manual.


So, I'd pretty much populated my initial level, when pureLight gets released, which makes sticking stuff in a whole lot easier, and also makes Basic Lighting so much nicer. Not that we were going to buy it initially, T3D was this years' major purchase, and I'd set the rest of my cash aside to pursue the great British crusade of trying to kill myself with booze. But after trying the demo - and working through Blender's exporting issues - I was pretty damn impressed.

Hence no deer for a month ... or probably longer. Having said that we haven't got off to an auspicious start and there was much deer last week due to the English soccer team qualifying for next year's World Cup.


But we have got off to an auspicious start with pureLight, which is pureWin.

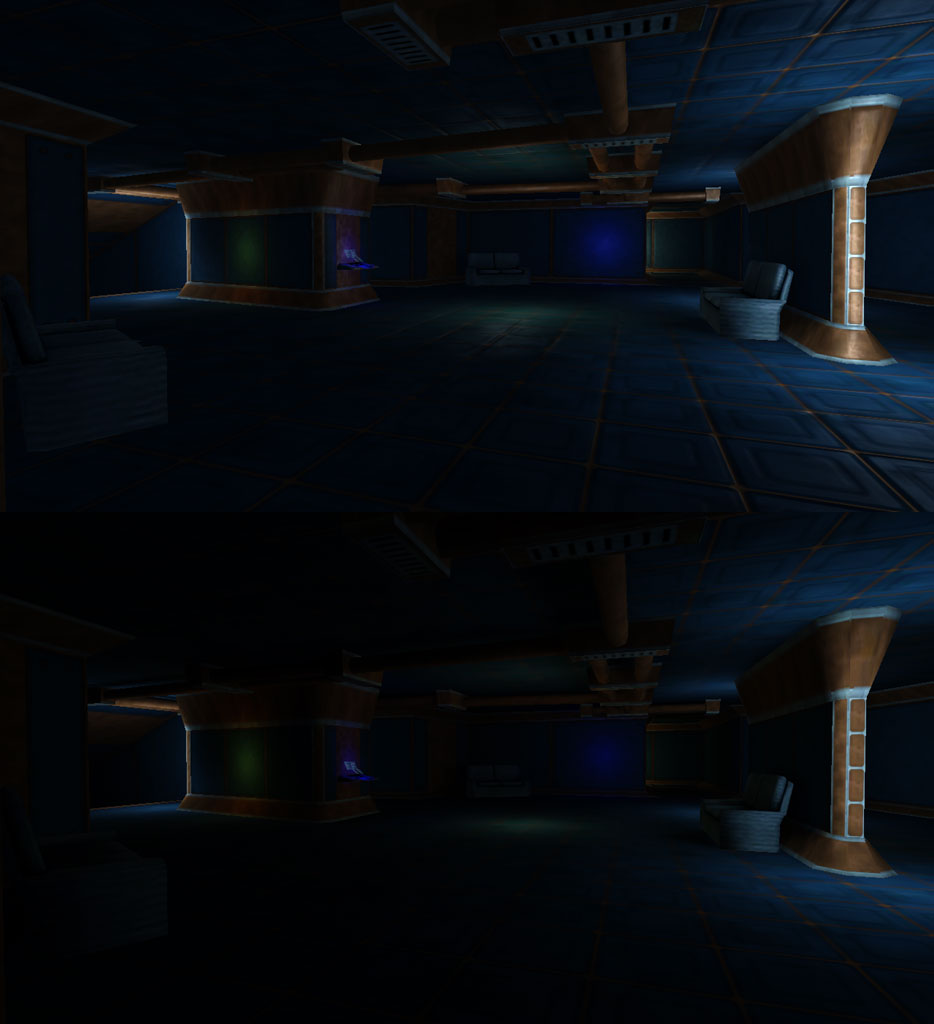
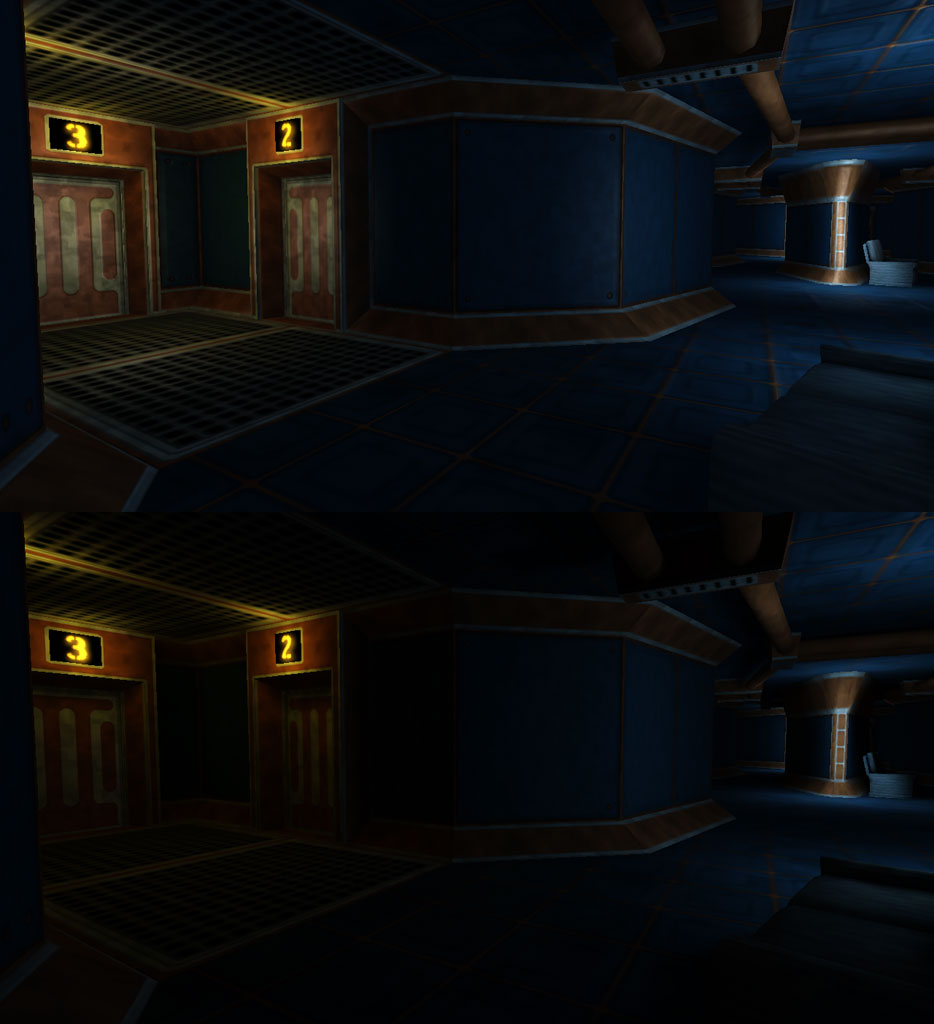
Basic Lighting with toneMaps now looks just like Advanced Lighting minus spec/normals, which is pretty damn excellent. To dip my toe, I have exported the first area of my big level, filled it out in Blender, minus any dynamic objects such as flashing screens etc which aren't in the screenshots - though I have placed the occaissonal amber or blue ambient glow on the lightmaps to show where they're going.

So the key for the screenshots is Advanced Lighting as the top image with Basic Lighting underneath. I divided the scene into just a few meshes, props/ablusions (all down one end for culling), props/area1 (almost everything which isn't wall/floor), props/bedroom (key point, requires extra stuff), emissive matierals (glowing numbers), translucent double sided materials (scrolling, floating console screens), and the main area geometry (everything you walk around on).


Then I slapped in a few lights, mimicking the illumination in the lightmaps, but also in Advanced Lighting it gets teh specular and normal maps to work. And it's this extra specular effect which makes the Advanced Lighting screenies look more 3D with the normals, and also a little brighter than the Basic Lighting, which is just using the lightmaps for geometry illumination. Of course anything without a lightmap (dynamic object like the player), still get the pointlights of the game engine shining on to them to provide illumination.


The ability to export an entire scene from Blender and have it arrive in the same XYZ in T3D with lightmaps is fantastic, no more messing around trying to line things up in the editor, no more worry about an absence of shadows, and objects looking too stuck on one another. I'm hardly going for realisim, but the painterly lighting effect that pureLight gives are opposingly subtle, dramatic and artistic.

It was also nice of the guys at PL to send me a better ASE plugin for Blender. I haven't had time to see what difference the newest PL version has with the Blender's terrible attempts to manage the Collada format, but hopefully Blender2.5 will address some of these.
Monday, 6 April 2009

It's The Economy Stoopid

Actually, it's the lightmaps. Map crashes on export? Bets are it's the lightmaps. Funny dark cuts along the edges of the brushes visible from certain angles and certain distances? Not brush borders, but lightmap borders.

Why does this all happen? Because geometry scale is 32, small scale lightmaps (like 8) cause trauma on larger brushes when calculating the lightmap. Keep brushes smaller for less lightmap calculation map crash trauma. Compressed edges of lightmaps visible? Make lightmap scale the same as geometry to dispell (though to be honest you'll probably still see a few of the little critters lurking out in the far distance if you have a long, long surface like a road). There's also an occaisonal light bleed in some interiors with this.


What the world looks like immediately after it spawns from my id

So, with that finally realised, we set out to design Map2. Map1 (aka High Wold, the pics of an urban environment in my previous blogs) was created as a large test BSP using large facade blocks as the buildings. Rather urbanized, terrace streets. Map2 was designed for more individual buildings, detached, semi-detached housing. The idea being to create a series of prefabs which I can then drop into editor/modeling program, arrange and then export en mass as a single object (BSP or mesh model).

And it all seemed to go okay like that. I did attempt a new method of creating a mesh model in Blender and then exporting it as a mapfile, but Blender's map exporter isn't up to anything particularly complicated, and the end result looked like a mangled, disjointed mess on close inspection. Blender can export mapfiles fine - if you stick to the basic rules of being BSP friendly (build it using individual blocks - think lego).


Church tower is 400m away, just out of rifle range but not sniper or lmg

So, establishing that prefabbing really is the way to go, and with a BSP version knocked up, I recreated the whole thing as a mesh model. Whilst polysoup collision (what you see is what you bang into) has been available for a while, the lack of lightmaps has meant that it just didn't cast realistic shadows onto itself or other meshes. This can look a bit odd to say the least. However, there is new tech on the horizon which may well sort this problem out, and which includes scandulous mention (it's not really scandulous, I'm just using a random adjective for teh interwebz draaama) that BSP will be more performance friendly. With Map2 copied into both BSP and Polysouped Mesh versions, it'll be interesting to what the difference is in-game using said new tech.


BSP version, roofs are NULLed

To be honest I was having so much fun building the mesh version that I imbellished it quite a bit, so it's got 7k faces instead of 5k as the BSP version. Performance-wise in current tech (TGEA1.7.1 'cos I haven't transfered all of my custom scripts over to 1.8.1 yet) the meshed polysoup wins out with an FPS of 30% higher than BSP (based on 5 locations and views at 1280x768 resolution with 1700m visibility). That's an max-average fps of BSP 125 and Polysoup 165.


Polysouped Mesh version - Spot the Difference!

Apart from the mesh lighting issue there are also a couple of other problems, such as the model vanishing when the fog/maxvis hits the centre of the bounding box (problematic with large meshes in low visibility environments - but fine with a long maxvis like I'm currently using). I'm a great believer that in making large environments as a single object is better for performance than making hundreds of individual objects and then sticking them in-world together. No matter how many surfaces it has, it is still just one object for the processor to initialize and then worry about, instead of 50. Another issue I've noticed with current tech's polysoup is that the colour/tone/intensity of the textures aren't as vibrant as they are when applied to BSP, probably because of the lack of lightmaps.

Anyhow, it'll be interesting to see what the new tech brings. Roll on Beta.

Friday, 23 January 2009

Environment Completed - sort of ...

Environment about done. We've got roads, facade terraced streets, enterable buildings, trees, lights, signs, boards, parked vehicles, traffic lights, extra facades, benches, bins, train track, train station, bus station, police station, petrol/gas station, ... you get the idea.


Hallelujah! I don't have to mess about with this anymore ... much

The vast majority of textures for an urban landscape are done, as are most of the models needed to fill such an environment. They're all textured with normal and spec maps to receive lighting/shadowing information. It looks good in DRL (dynamic range lighting), has good performance with a high visibility level. And it looks good in standard lighting, has excellent performance with a high visibility level. It's a full, square-mile wide (1600m in new money), open environment.


Just like real life, your going no-where with British Public transport....

And just as importantly - (more importantly) - it has shown a methodology for making such an environment. I now know how to push things to their limit without everything return to primordial soup (oh the triumphs and tribulations of trial and error!). In effect I don't have to waste my time in a heroic but somewhat pointless struggle with the Second Law of Thermodynamics. I know what pitfalls to avoid, because I've already fallen down the bloody pit, slapped the hungry tiger, and climbed back out.


Big amber signs are the clue to use the bridge and not fry on the electrified track

And I've created my models, the little things I can now throw into a world and manipulate as needed. They pretty much cover all of the essential objects to throw into an urban or rural environment (see first paragraph). I'll still have to knock out a few extra "level/gameplay specific" models as needed, but the vast majority of "stock" models are completed. All 70+ of them.


The world's most spartan pub - at the moment

So now it's on to people - or more, back to people, as I'm re-jigging my models and (tweaking a couple of) animations. Re-jigging in this case primarily revolves around remodeling the joints for better mesh deformation via advice given to me from the guy who worked on the new TombRaider for Wii and PS2 (and good advice it was too). I've had a tinker with a couple of animations and sorted out my previous problems keeping direct alignment down a sight whilst aiming at an acute angle along the Y axis (delicate tweaks every 5-10 minutes for 9+ hours until I fixed it). A bit more modeling and a rehash of my LODs and it'll be on to base, diffuse, normal and specular texture mapping them.


The exact places where my story (yes there is one, it's supposed to be an action-adventure, and adventure needs plot) takes place may be fictitious, but they're based within a real landscape. And yes, Wetwang is a real place.

Also I need to make a few "static people", basically a character model in an unanimated pose. These aren't (just) for filling an environment currently devoid of life, but to be an event marker and allow a digi-painted, comic book style, cut-scene to be triggered (by some sort of GUI ... I guess ... but I'll come up with a solution for that later when I'm working on the gameplay mechanics on the adventure side of things, the action has already been tested). This will enable plot (and humour) to be imparted and will also sidestep dodgy voice-overs (nothing ruins immersion like bad voice-overs) or convoluted 90 minute machinima re. Mr Kojima. And it'll help reinforce the overall art style, as I will eventually get round to digi-painting the skyboxes in the same manner (as do the environment textures in general, but it does get hidden a little by the normal mapping). But for now the graphic tablet will continue to gather dust.
So, methodology learnt, skills acquired, temperamental "stuff" identified and solved or avoided or tweaked or battered into working.


Available in HD if you click the vid - then click the timeline or it'll keep showing a loading symbol every few seconds if you start up from zero. (Dang YouTube - I'll try mpeg4 instead of H264 avi next time)

And there's a couple of extra vids showing long range weapons out to 400 metres. Available in HD with the "nuance" listed above.

Right, back to modeling those knobbley knees....

Wednesday, 19 November 2008

We Built This City on Rock and Roll

My new hard drive appears to be working fine, no problems since reinstalling my entire life.....


Been down in London (Where? Lon-don? Could you spell that please? L....?) and paid 12 quid (18USD) for a Mojito, which appeared to be a long glass full of ice. Consumed a good Magnum PI worth of free champers at a wedding so I guess it all evened itself out. Lon-don quite nice, but wouldn't want to live there.


Slowly but surely environment takes shape. Got street lights in, avenue style trees, and .... stuff. Still more .... stuff ... to do, mainly signs, benches and a few interior props before I'm happy. Had a further fiddle with the facade textures of buildings, and have finally decided on an art style.


Also been playing around with DRL and HDR lighting, and how the whole thing works with 200+ models (not batched) and visible range. And the answer appears to be ... fine. There really isn't much performance saving to be gained from cutting the visibility right down, or much to be lost from moving it right up.


So I've decided on just over a mile view at 1800 metres. Originally I was planning on half of that, but the performance change is fairly negligible. I'll see how the whole thing works when I have an extra 3-400 trees in the background (using batching to speed it all up).